Call Flow is a comprehensive incoming call management tool with an intuitive visual editor and powerful features. This article provides an extensive guide on how to use it to configure your incoming calls.
We also invite you to explore this article alongside our short tutorial video on incoming calls.
¶ Call Flow overview
To start, a number is required. If you don't yet have one, press the Buy a number button (Fig. 1) to order a number from us. More on this process in the Phone numbers article. To see your available numbers, press the My numbers button (Fig. 1). By clicking on a number, you will add it to the visual editor of Call Flow. Note, that if a number is grayed out, then it's already added to your Call Flow. To manage all available, non-grayed out numbers at once, press the Other numbers option.

To set up how incoming calls will be processed, elements must be used. By pressing the Elements button (Fig. 1) you will see a dropdown menu with all of the available elements. You can read about each element in this article.
Each element has an input and one or more outputs. For example, Call to SIP element (Fig. 2) has 3 different outputs:
- answer - define what will happen if the call was successful;
- no answer - define what will happen if the call wasn't picked up;
- cancel - define what happens if the caller cancels the call.
Based on what happens when the system will reach this element, it will continue through one of these outputs.

In most cases, one output can be connected to only one input. This depends on the function of the output. The Queue element, as an example (see Fig.5.), includes an output called "members" designed to connect multiple agents to the queue.
Every element has unique editable settings. Double-click on an element to open its settings menu. In the example below (Fig.3.) we've added a description and set forwarding to a SIP device with the number 41918715. We will cover settings of each element in the Elements section.

Elements are connected with each other by clicking and dragging on the output. In the example below (Fig. 4) a simple logic is established: for incoming calls to number 37163655660, call the user with selected SIP device (Fig. 3).

There are no limitations in terms of complexity of your call handling, and you can add as many elements as necessary. To ensure readability, it's advisable to write descriptions for the elements, as well as keeping them organized. To create a better appearance, click on any point on a line to create a breaking point (reference - Fig. 5).

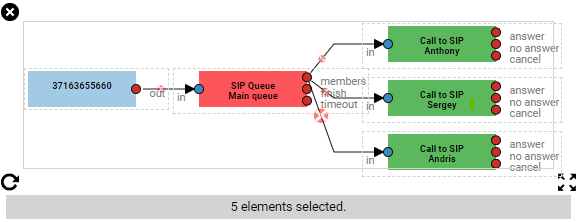
Click and drag on an empty space to create a selection (Fig. 6.). This allows you to do the following:
- Press on the cross to delete all selected elements;
- Press on the rotation icon to rotate the elements;
- Press on the resize icon to change the size of the selected elements.
Don't forget to save your Call Flow each time you make changes. Saving it will create a checkpoint, to which you can reverse by clicking the Version button in the Call Flow menu (Fig.1) and selecting a previous version. Even if you delete your Call flow, you can always restore it from here.

Now you are all set to create your own Call Flow!
¶ Elements
In this section, we'll cover the function, outputs and settings for each existing element.
¶ Call to phone
This element allows you to direct the call to a selected phone.

- answer - define what happens if the call was successful;
- no answer - define what happens when the set timeout for waiting time is reached and the user does not answer the call.
- cancel - define what happens when the caller decides to cancel the call while waiting for the user to answer it.
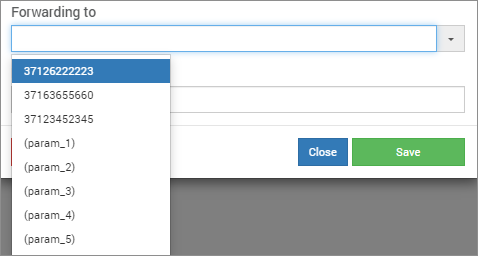
In the Forwarding to field, select the phone number you want to direct the calls to. Note, that here you can also select a Caller ID that is verified in your account. It's also possible to select a dynamic parameter here that would contain a number. This parameter can be passed from the HTTP notification element.
Ring time in seconds field specifies how long the system should dial the set number before passing the call through the “no answer" output.
¶ Call to SIP
This element allows you to direct the call to a selected SIP device.

- answer - define what happens if the call was successful;
- no answer - define what happens when the set timeout for waiting time is reached and the user does not answer the call.
- cancel - define what happens when the caller decides to cancel the call while waiting for the user to answer it.
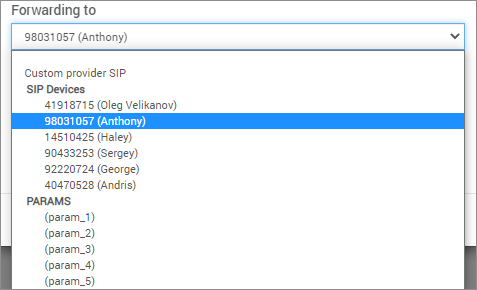
In the Forwarding to field, you will see your available SIP devices. You can manage your SIP devices in the SIP Devices subsection of the User section. Read more on this in the SIP devices article. Just like in the Call to phone element, you can select a dynamic parameter here that would contain a SIP name. If you need to forward the call to a SIP from a different provider, select the Custom provider SIP. Enter the SIP in the shown format.
Timeout field specifies how long the system should dial the set number before passing the call through the “no answer" output.
¶ Call to User
Similar to Call to phone and Call to SIP element, Call to user allows you to forward the call to an existing user. Unlike the Call to SIP element, this particular element ensures that the call is directed to the same user, regardless of any changes made to their SIP device.

- answer - define what happens if the call was successful;
- no answer - define what happens when the set timeout for waiting time is reached and the user does not answer the call.
- cancel - define what happens when the caller decides to cancel the call while waiting for the user to answer it.
- error - define what happens if the user isn't available.
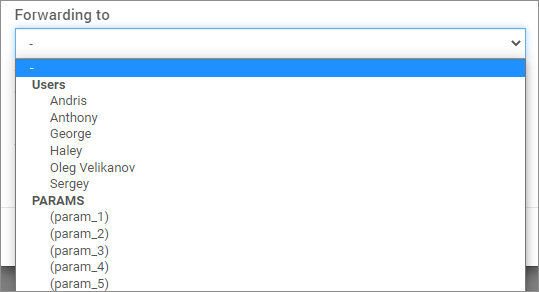
In the Forwarding to field, you can select any user that exists on your account. Just like in the previous two elements, you can select a dynamic parameter here.
Timeout field specifies how long the system should dial the set number before passing the call through the “no answer" output.
¶ Voice mail
Using this element, you can play preconfigured voice messages to the caller, while also providing them the option to record their own message. Note, that in order to use the prerecorded messages functionality, you must first setup the voice mail in the users settings. You can find the instruction in the Voice mail section of the Users article.

- true - define what happens if the caller successfully recorder a message;
- no answer - define what happens if the caller drops the call before leaving a message.
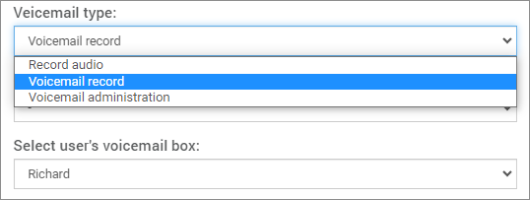
There are 3 possible functionalities for the Voice mail element, that you can choose in the Voicemail type field:
- Record audio - allows the caller to leave a message. After playing a "beep" sound, the message is recorded;
- Voicemail record - plays the prerecorded message and allows the caller to leave a message. When using this option, a voice prompt will guide the caller to record their message.
- Voicemail administration - allows to access your voice mail settings. This can also be accessed by dialing the set extension (refer to the Voice Mail section in the Users article).
In the Select device field, you will see all available SIP devices. Note, that if voicemail isn't enabled for the chosen device, recorded message won't be saved. In the Select user's voicemail box field you will see all of the users that have enabled a voicemail box. It's up to your preference to set the user in either of the two fields, just make sure that the voicemail is enabled.
¶ Play audio
Play audio element allows to play any audio you select for your client. It is advisable to use the .mp3 or .wav file extension. If your audio has a different format, please convert it to the supported one (you can use free online services, like https://convertio.co/).

- out - system will continue through this output after playing the audio.

Press the Add files button to add your audio. You can upload multiple audio files at once. Once uploaded, you can then choose the specific file you want to be played. Additionally, this element serves as an audio upload tool for other elements such as IVR and Queue, the audio files uploaded here will also be accessible in those elements.
¶ IVR - Voice menu
The Interactive Voice Response element allows you to create a voice menu for your incoming calls.

- key 0 to 9 - define what happens when the caller hits one of these keys;
- false - define what happens if the caller didn't select any key after playing the audio for the second time.
In the settings, select the audio that will be played for the caller. You can upload it through the Play audio element (reference the Play audio element from this article). Make sure your audio is descriptive, so that the caller would clearly understand what key to press for his needs. Note, that you don't need to define all of the keys, only the ones you need. The audio will automatically play 2 times for the caller until a key is pressed, and afterwards, the call will proceed through the false output.
¶ IVR - number input
This element allows to receive input data from the caller. The caller will be able to enter digits, that then will be passed via “input data” output.

- input data - if the input from the caller will be successful, it will passed via this output;
- false - define what happens if the data input wasn't successful.
By opening this element's settings you will be able to make several adjustments to how this element functions.
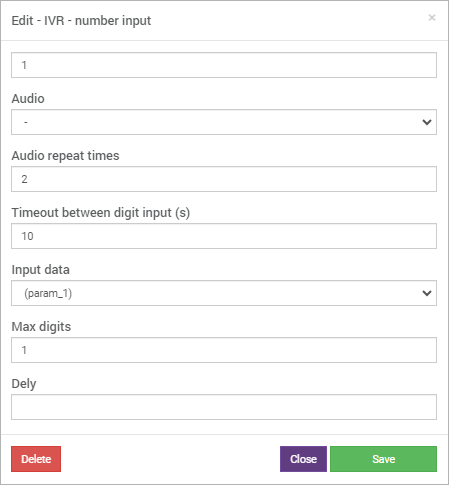
Audio - here you can select the audio that will be played for the caller. You can upload it through the Play audio element (reference the Play audio element from this article).
Audio repeat times - configure how many times the audio will be repeated.
Timeout between digit input - define how long the system will wait for a digit input before ending its work.
Input data - configure what variable will be used to pass the input data. You will be able to select it in elements like Call to SIP.
Max digits - define how many digits the user can enter.
¶ Time routing
This element allows you to set up working hours for your call center. The hours are applied in your local time.

- true - define what happens if the call is within the set working hours;
- false - define what happens if the call is outside the set working hours.

Enable the days when you're planning to take calls and enter a working time.
¶ Queue
This element will allow you to put your clients in queue and assign calls to your agents based on the settings you select. It's essential if you have a high volume of calls.

- members - this output is designed to connect all agents who will be responsible for answering calls from the queue. You have the option to connect Call to phone, Call to SIP, and Call to user elements to this output. However, it is advisable to use the same type of element for assigning agents.
- finish - define what happens when the system successfully assigns a call to an agent;
- timeout - define what happens when the set timeout has passed and the call wasn't picked up by an agent.
There are several strategies how the calls will be assigned to your agents.
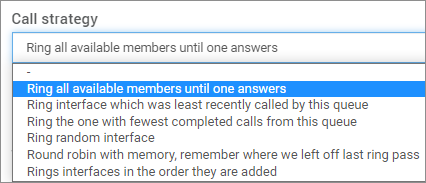
Ring all available members until one answers - this will send calls to all active assigned agents at once, until one of them doesn't pick up. This works best when you need to make sure that all calls are picked up as fast as possible, thus resulting in high ASR (answer rate).
Ring interface which was least recently called by this queue - this setting will look for the agent that has the highest waiting time on the line and assign the call to that one. This allows for an equal work load distribution.
Ring the one with fewest completed calls from this queue - this strategy will calculate which agent has the least picked up calls count for the day and assign the call to that one. This would allow you to make sure all agents receive equal work load throughout their working time.
Ring random interface - this will simply call a random agent, without any kind of logic.
Round robin with memory - this will call each agent one by one until one answers. The system will remember where it left off and assign the next call to the next member in order, insuring an even work load distribution.
Rings interfaces in the order they are added - when you add the members that will pick up calls from this queue, the system remembers the order in which you add them. This strategy allows to call agents per this order.
There are also additional settings that you can change:

In the Music on hold field you can set an audio that will play for the caller while he is waiting for an agent to pick up. Upload the audio through the Play audio element (see the Play audio element section from this article).
Timeout will define how long the system will allow the client to wait in the queue, before sending the call through the timeout output.
Member timeout defines how long the queue will wait for a designated user to pick up the call, until it passes it to the next one.
Join if empty defines if the caller will enter the queue, even if all agents are offline at that moment. For example, if all agents are on calls and a new client reaches the queue, with strict mode enabled the call will go through the timeout output.
Ring in use defines if the calls can go to agents that are already on a call.
If no answer is an option to force assign the call to a random agent from the list if the timeout has passed and the call wasn't picked up.
¶ Random
This element does not have any parameters and serves the sole purpose of randomly routing the call to one of the elements connected to its output. It can be useful, for example, to create variety for the music that plays on holds or in queue.

¶ HTTP and SMS notification
This element allows you to retrieve information from your server.

- 1 - 5 - define what happens when the response from your server is one of those digits;
- other - define what happens if the response from your server is something else other than digits 1-5.
In the HTTP URL field, enter the address to your server. In the URL you can add the following parameters that you can process on your server:
- (callerid) - contains the callers number;
- (callto) - contains the agents number;
- (answeredtime) - the exact time at which the call was answered;
- (dialstatus) - the calls status, e.g. ANSWER or BUSY.
The server should send a HTTP response back. There are two options for your response.
- You can send back a digit from 1 to 5 and the system will go to the corresponding output.
- By sending back text such as "param1=8172615", it will be directed to the "other" output. Subsequently, you can connect the Call To SIP element to it, where in the Forwarding To field the (param_1) option is selected, thus specifying the agent to whom the call will be directed.
¶ Call state
This element will check if the current call is active and will continue through the according output.

- active - define what happens if the current call is still active;
- dropped - define what happens if the call has already ended.
¶ SMS notification
This element allows you to send a message to a selected number.

- out - define what happens after sending the message.

In the Phone field, define the destination phone number;
In the Sender ID field, select the number that the client will see.
In the Message field, type in your message.
You can use the following parameters for all fields:
- (callerid) - callers number;
- (callto) - agents number;
- (param_1) - (param_5) - parameter from the HTTP notification element.
¶ Email notification
Similarly to SMS notification element, this element allows you to send an email to chosen email.

- out - define what happens after sending the message.

In the Email to field, define the destination email address;
In the Subject field define the subject of the email.
In the Text field, type in your message.
You can use the following parameters for all fields excluding the Email to field:
- (callerid) - callers number;
- (callto) - agents number;
- (param_1) - (param_5) - parameter from the HTTP notification element.
¶ Change CallerID
This element allows to modify the number of the caller. This can be used to show additional information or hide the number for the receiving agent.

- out - define what happens after changing the callerid.
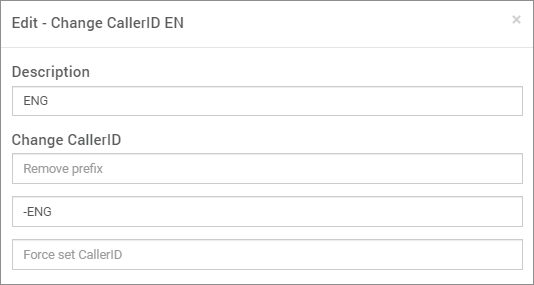
In the Remove prefix field, enter the prefix you would like to remove. For example, if the number is 37122334455, by entering “371” you will get back 22334455.
In the Add sufix field, enter a sufix. You can add any symbols.
In the Force set CallerID you can enter any number or text, thus changing the number completely.
¶ Music on call, hold
This element allows to set music for all elements. This element will override music in all of the elements,

- out - define what happens after setting the music.

Ovveride music on call, hold, transfer, queue - define which audio will play in all of these occasions.
¶ Caller name lookup DB
This element allows you to verify the identity of a caller using your own database. When a call reaches this element, it sends a GET request to your specified URL, including the clients Caller ID as a parameter, in a value named “calleridvalue”. You can customize the parameter name as desired, such as `myparameter=`.

For example, you might use a URL like this to receive the GET request: `www.yourpage.com/search-client?callerid=calleridvalue`. Your server must be equipped to process this request and determine if the Caller ID exists in your database. The lookup logic must be programmed on your server side.
Based on the lookup result, your server can return different values:
If the caller ID is found: You can return back any value, which will repalce the client Caller ID. You can simply return the original Caller ID if you don't want to change it, or you can return a name or any other customer information. This Caller ID will be shown to the agent when he will receive the call. Subsequently, the element will proceed via the Found output.
If the caller ID is not found: If the lookup does not yield any results, you can return an empty string. In this case, the call flow element will proceed via the Not found output.
¶ Say price from parameter
This element allows to voice parameters. In the element settings select the parameter and language of the voice.

Routing by history
This elements checks if the current client on the call has already been in communication with one of the selected agents and will assign the call to that one. You can add any amount of SIPs or phone numbers to check. This allows your clients to communicate with already familiar to them agents.

- answer - define what happens if one the assigned agents picks up the call;
- no answer - define what happens when the set timeout for waiting time is reached and the call wasn't picked up;
- cancel - define what happens when the caller decides to cancel the call while waiting for an agent to answer it;
- not found - define what happens if the selected agents haven't received a call from the current client.
In the element settings you can configure the timeout, as well as select the users that the system will check for previous calls.
¶ Autodialer routing
This element is used for the Autodialer tool, specifically the Callflow Autodialer type. This type of Autodialer allows to configure call processing after a contact has picked up. For example, an audio can be played or a voice menu for the client. You need to connect this element with the number that was selected in the Autodialer campaign and select the campaign name in the element's settings. You can also select all campaigns.

- dial - define what happens when a contact from the Autodialer campaign has picked up the call.
- incoming - define what happens when a contact from the Autodialer campaign makes an incoming call.
- other - define what happens when someone makes an incoming call to the connected number and that caller is outside of the campaign.
¶ Text-to-speech
This element allows you to transform any text you need to a speech. We use the most advanced, realistic text-to-speech services available on the market - Microsoft Azure and Amazon AWS. Choose any voice you desire for a wide selection of options and languages. If you're using Autodialer, in the text you can also add contact parametrs which also will be voiced. There is also a possibility to change the speed rate of the voice.

- ok - define what happens if the text-to-speech element worked as expected,
- fail - define what happens if the speech generation failed for some reason.
¶ Short number
This element is used for internal calls. Enter the agent number (this can be found in the Users section) in the element settings. Define how an incoming internal call to this user will be processed.

¶ Custom function
Currently this element has only one function that you can select in its settings - Text-To-Speech pregeneration. It can be used in the case that you need to ensure that there is no delay for the Text-To-Speech on call. Simply connect this element before a Text-To-Speech element.
