Our versatile Autodialer does more than just save time and resources on cold calls; it also allows the delivery of automated messages or Interactive Voice Responses (IVRs) to your contacts. This multifaceted tool is designed to enhance your communication strategy across various stages of customer interaction, making it a comprehensive solution for your efforts to reach clients. This article is structured to be read sequentially from top to bottom, providing a step-by-step guide through the entire process of setting up an Autodialer campaign, including its usage and result analysis.
Autodialer types
Our lineup includes three types of Autodialers, each built for different goals and have slight variations in their workflow. Our Autodialer types cover most frequent use cases, allowing you to pick the right tool to boost your communication strategies effectively.
Predictive dialer
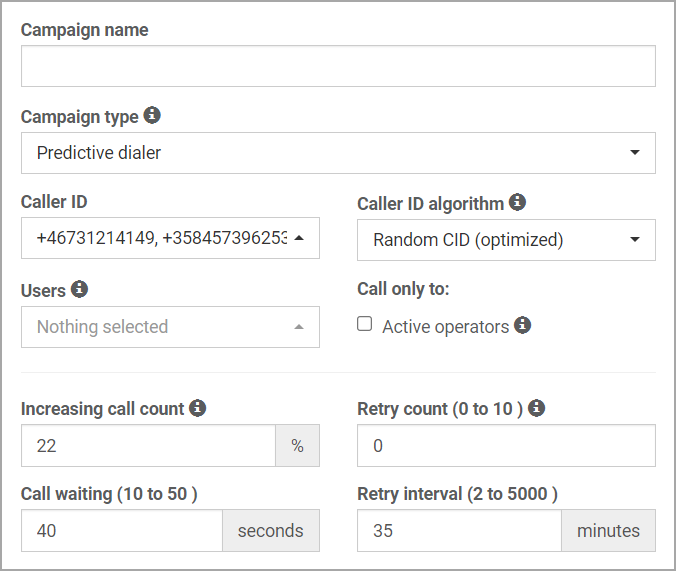
This classic Autodialer type, which may already be familiar to you, is designed for handling big lists of cold contacts. First, the system places a call to the contact. Upon answer, it will either verify the presence of a live respondent if Answering Machine Detection is active, or immediately redirect the call to an available agent. Follow these steps to set it up:
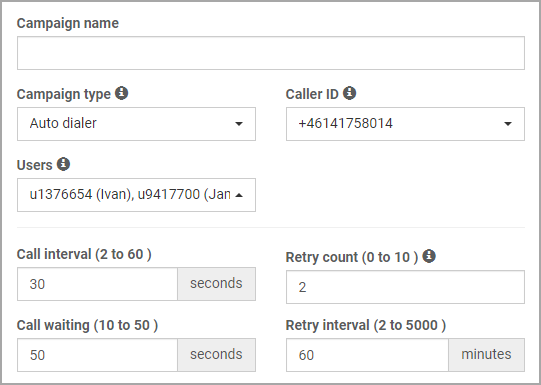
- Within the Caller ID field, select the numbers the system will utilize for outbound calls to contacts. If you have bought our Random Caller ID, then you will also be able to use it within this type of campaign.
- Then, in the Users field, choose the agents that are assigned with answering calls from this campaign. You have the flexibility to select individual users or entire permission groups. For more detailed information on permission groups, please refer to the Users section of the Wiki.
- Next, please review the Additional settings available for this type of campaign below. Afterwards, continue to Autodialer Settings and Options and Contacts sections of this article for further steps on setting up your campaign.
Additional settings for this type of campaign:
Caller ID algorithm includes two options:
- Random CID: This option selects a Caller ID randomly from the list of numbers selected in the campaign. For each call will, a random number will be chosen from the list.
- Random CID (optimized): This option enhances the basic random Caller ID selection by incorporating Caller ID matching logic. It prioritizes using a local number corresponding to the destination of the contact. If a local number is not available, it will select the number that offers the best calling tariff. For instance, if you have a Swedish contact in your campaign, the algorithm will use a Swedish number if available. If you only have Danish and USA numbers, it will choose the Danish number, as calling within the EU is cheaper than using an international number. This option allows you to upload contacts from around the world into one campaign and efficiently process them.
Call Only To - enable this feature if you desire your agents to receive calls exclusively when they have the Operator Dashboard open.
Increasing Call Count - important parameter that sets the amount of simultaneous calls that the system will initialize per available agent. You can calculate the amount of simultaneous calls for a campaign by the formula below:
Simultaneous calls = Available agents * Increasing call count percentage
Here are some examples:
If there are 10 free agents added to the campaign and the percentage is set to 0%
Simultaneous calls = 10 * 0% = 10
If there are 3 free agents added to the campaign and the percentage is set to 100%
Simultaneous calls = 3 * 100% = 6
If there are 5 free agents added to the campaign and the percentage is set to 500%
Simultaneous calls = 5 * 500% = 30
Call waiting - this parameter sets the duration the system waits for the contact to answer before disconnecting the call.
Retry Count - this parameter allows you to specify the number of attempts the system should make to reach a contact if the initial call does not connect.
Retry Interval - this defines the duration the system waits before making another call attempt.
Robocalls
This type of Autodialer enables the broadcasting of automated messages, Interactive Voice Responses (IVRs), among other functionalities to your contacts. It leverages Call Flow technology, which also is used for configuring incoming calls.
- Just like with the other two Autodialer variants, you need to choose the specific number that will be utilized for outbound calls to your contacts. However, you might observe that there is no option available for selecting users. This is because the logic of how contacts will be processed upon pick up is configured on the Call Flow page. Continue with the article to understand how to set it up.
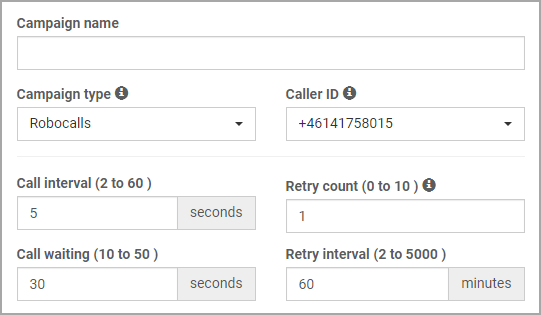
Available settings for this type of campaign:
Call interval - instead of Increase Call Count parameter within predictive dialer, Agent to Contact uses a different mechanism. It will continuously initiate new call following the time interval you specify here.
Call waiting - this parameter sets the duration the system waits for the contact to answer before disconnecting the call.
Retry Count - this parameter allows you to specify the number of attempts the system should make to reach a contact if the initial call does not connect.
Retry Interval - this defines the duration the system waits before making another call attempt.
- After customizing the above settings, you can continue configuring your campaign referring Autodialer Settings and Options section and uploading your contacts as shown in the Contacts section. Then, proceed to the Call Flow page, located under Tools, to continue with the setup of your campaign. We advise to explore the Call Flow manual first, to better understand how this tool functions.
- In the Call Flow, add the number that you've assigned in the Autodialer campaign. Then, add Call Flow elements based on your requirements. Below is a basic setup - upon pick up the contact will hear the audio selected in the Play audio element.
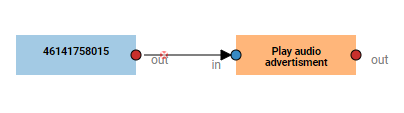
This is the most basic option you can configure. You can create much complex systems:
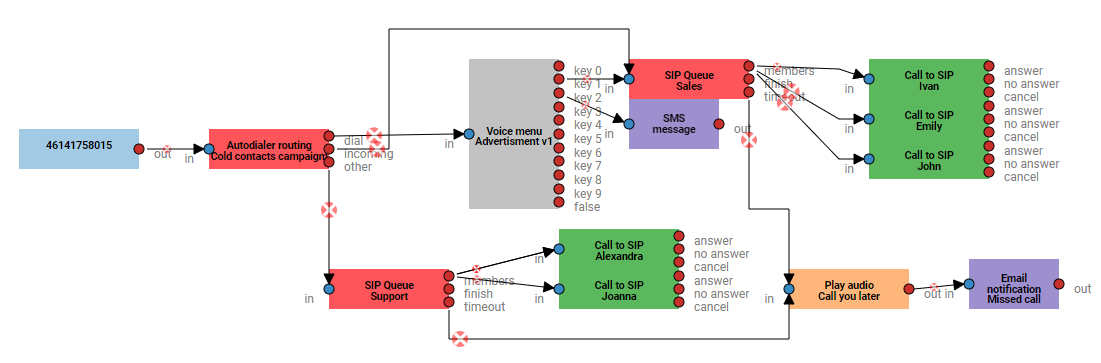
You may also notice a special element that is used here - Autodialer routing. It allows to separate different kind of scenarios:
- Calls that come from the Autodialer campaign. (dial output)
- Incoming calls from contacts within the campaign (incoming output)
- Other incoming calls to this number not related to the Autodialer campaign.
This element along side all others is also explained in the Call Flow manual linked above.
Agent to Contact (Auto dialer)
This Autodialer type is suited for engaging with your hot leads. It initiates by connecting to an available agent before dialing a contact from your list, guaranteeing that the client is instantly connected to a responsive agent.
- Similar to the Predictive dialer, select the number or numbers to be used for calling clients, as well as the agents who will be communicating with the contacts. Next, please review the Autodialer Settings and Options and Contacts sections of this article for further steps on setting up your campaign.
Available settings for this type of campaign:
Call interval - instead of Increase Call Count parameter within predictive dialer, Agent to Contact uses a different mechanism. It will continuously initiate new call following the time interval you specify here.
Call waiting - this parameter sets the duration the system waits for the contact to answer before disconnecting the call.
Retry Count - this parameter allows you to specify the number of attempts the system should make to reach a contact if the initial call does not connect.
Retry Interval - this defines the duration the system waits before making another call attempt.
¶ Autodialer Settings and Options
Let's cover all other available settings and options for your Autodialer campaigns.
Additional settings
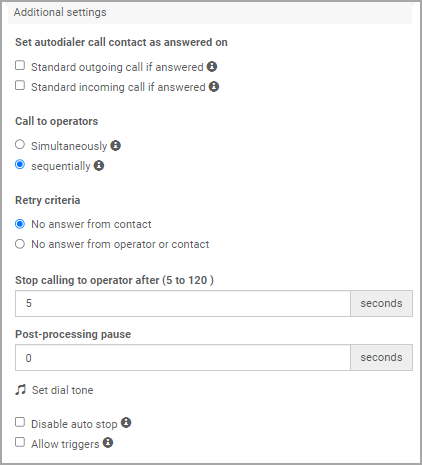
Set Autodialer call contact as answered on: when selected, this ensures the Autodialer does not attempt to call a contact again if there is already a record of a successful outbound or incoming call in the system with that contact's number.
- Standard outgoing call if answered - activate this feature to prevent the system from placing a call to a contact within the campaign should an agent manually make a successful outbound call to the said contact.
- Standard incoming call if answered - turn on this feature to stop the system from calling a contact within the campaign if there has been a successful incoming call received from that contact.
Call to operators: outlines the method through which agents are allocated calls from the campaign.
- Simultaneously - all assigned agents simultaneously receive the call, and the first agent to answer is assigned the call. This ensures the fastest response.
- Sequentially - calls are routed to agents in a predefined order, prioritizing those who have been idle the longest. This ensures an even distribution of workload among agents over time.
Retry criteria: specifies under what conditions the system will initiate a subsequent call attempt to a contact, given the Retry Count parameter exceeds 0.
- No answer from contact - another call attempt will be made exclusively if the contact did not answer the previous call. Should the agent fail to answer, the system will not retry the call to the contact.
- No answer from operator - or contact: another call attempt will be made if there was no response from either the contact or the agent during the previous attempt. This ensures maximum effort is made to establish a connection.
Stop calling to operator after - determines the duration the system will wait for an agent to answer the call before terminating the connection attempt with the contact. This setting ensures timely handling of calls by automatically redirecting or ending calls that are not promptly addressed by an agent.
Post-processing pause - specifies the duration allocated to an agent for After Call Work (ACW), which is the amount of time an agent has to complete any follow-up tasks after a call ends before being available to receive a new call. This ensures agents have sufficient time to properly conclude one interaction before starting another.
Set dial tone - this feature allows you to customize the waiting experience for clients by uploading your own choice of music or sounds. This auditory content will be played to clients during the period they are on hold, awaiting an agent to connect with them on the call.
Disable auto stop - if you are dynamically adding contacts via our API, enable this option.
Allow triggers - the functionality of triggers is detailed within the Settings article of this Wiki. For Autodialer campaigns specifically, there is a trigger option available that enables the sending of an SMS following a successful call with a contact. For further information on how to implement or utilize this feature, please refer to the Settings article in the Wiki or contact our support team for assistance.
¶ Customized statuses
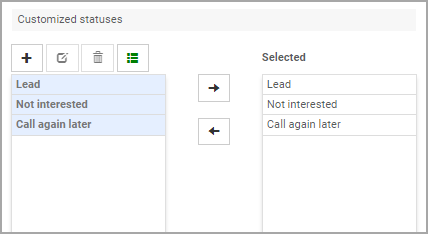
This feature enables the creation of unique statuses for use with contacts within the Operator Dashboard. Upon receiving a new contact, the Status column becomes interactable, allowing agents to categorize each contact using the custom assigned statuses. This functionality aids in the immediate organization of leads. When exporting the contacts, you'll be able to see the assigned statuses.
Click on the plus icon to create a new status, and then input the desired name for this status. Once you've crafted the statuses you had in mind, add them to the Selected field. Simply choose the necessary statuses and click on the appropriate arrow icon to include them.
¶ Answering Machine Detection
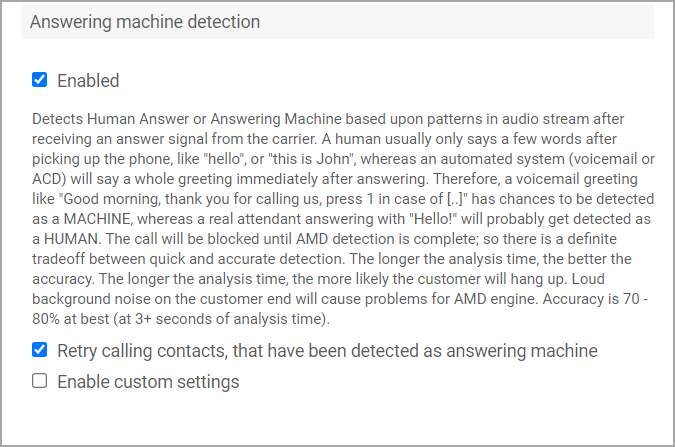
Our advanced technology designed to reduce false answers, such as voicemails, Interactive Voice Responses (IVRs), and dial tones. Upon connection, the system actively listens for the few initial seconds to discern whether the respondent is a human. In instances where an answering machine is detected, the call will be dropped and the contact's status will be updated to "AMD" within the contact list, indicating the answering machine detection outcome. It's imperative to understand that while this system enhances recognition capabilities between live conversations and automated messages, its precision is estimated at 70-80% effectiveness at best. This feature is not foolproof but serves as a valuable tool in optimizng your call processes.
If you wish to retry calling contacts that have been detected by the Answering Machine Detection (AMD) system, you can enable the appropriate option, as shown in Fig. 8 - Retry calling contacts, that have been detected as answering machine. This feature is useful in scenarios where a contact was temporarily unavailable and their voicemail was playing on pick up. Under normal circumstances, such contacts will be marked by AMD and will not receive additional call attempts. However, by enabling this option, you can ensure that these contacts are retried, providing another opportunity to reach them.
For those looking for a more tailored approach, the Answering Machine Detection settings offer customization options, such as adjusting the analysis duration, through the Enable custom settings option. This level of customization allows you to fine-tune the detection feature to better suit your specific operational needs.
¶ Operation hours
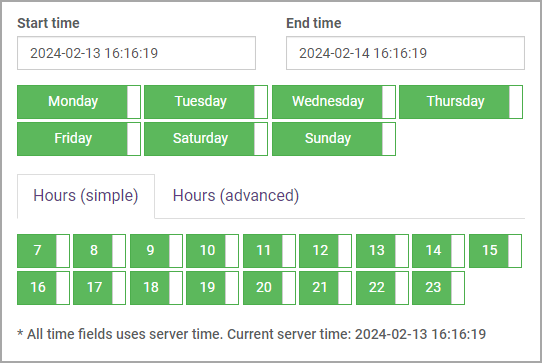
This section allows you to configure the specific times and dates for your campaign's operation.
Start time - Here, you specify when the campaign should begin. To initiate the campaign immediately, you can select the current time or any time in the past.
End time - This option lets you determine when the campaign will cease operations. If you do not need to set a specific end time, you can extend the End time by selecting a date up to a year in the future.
Moreover, you have the flexibility to adjust which days of the week and the specific hours within each day that the campaign will be active. By default, we have disabled the ability to run Autodialer campaigns during nighttime hours as a safety measure. If your working hours include nighttime, you can manually set the working hours for the campaign via API. For more detailed instructions on how to do this, please visit the API section of this article.
¶ Contacts
Once you've saved your campaign after you finished configuring settings to your requirements, it will become visible on the Auto Dialer page. From there, you can access the contacts interface by either clicking on the Contacts column or by clicking the Edit button followed by the Contacts button. To upload your contacts, click on the Add contacts button.
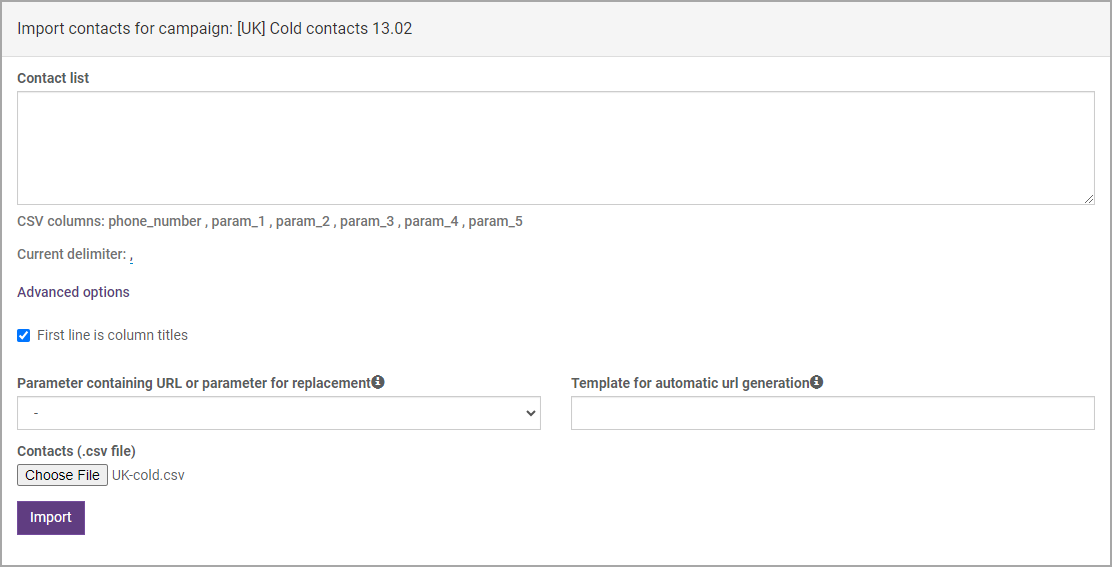
Alongside phone numbers, you have the option to include up to five custom parameters for each contact. These parameters will be displayed to your agents when they are using the Operator Dashboard – more details on this can be found in the according section of this article. Please take note of the required format: the first column must always contain the phone number, followed by up to five parameters, each separated by your chosen delimiter.
You can add contacts manually through the Contact list field or by uploading a CSV file containing your contacts. If opting for the upload, ensure that each piece of data is in its separate column, the file extension is .csv (not .xlsx or other formats), and specify a comma as the Current delimiter parameter. In case if your file contains column titles, you can select the First line is column titles option to exclude the very first row.
If you use a CRM system for your operations, we offer a convenient feature that can automatically open the current contact in your CRM. In the Parameter containing URL field, input the parameter designated to carry a link or a variable. If you're using a variable, in the Template for Automatic URL Generation field, input the URL leading to your CRM or website and place "{var}" within the URL template, which will be replaced by the chosen parameter. As an agent receives a call, this parameter will be dynamically inserted into the URL. In both scenarios, when receiving a contact, the link will be opened in a new tab. This functionality enhances the efficiency of accessing contact information directly within your CRM.
If the upload was successful, you should see your contacts appear in the list. If you added custom parameters, make sure you have enabled corresponding hidden columns (Fig. 11) and that the data is displayed correctly.
Now, at this point you're all set to run your Autodialer campaign. Return to the campaign list, and press Start.
Upon the campaign completion, by opening the contact list, you will see that some additional data has appeared.
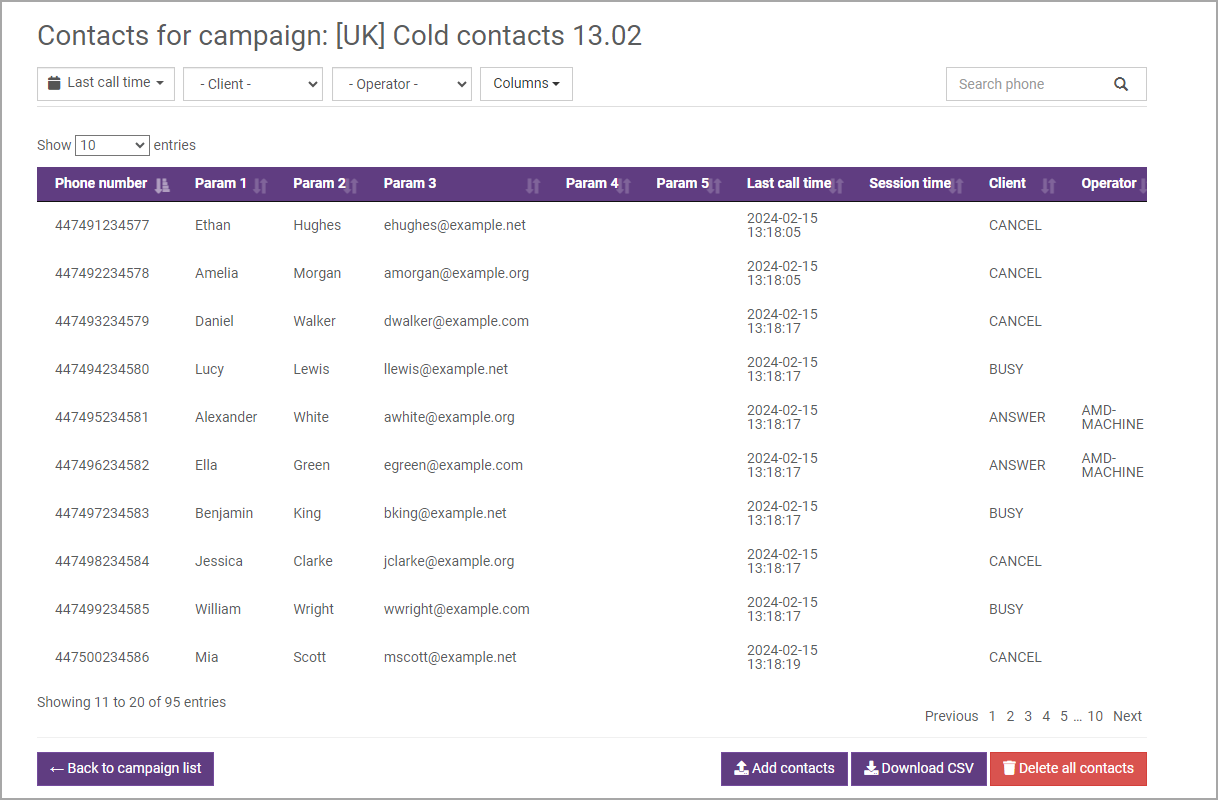
You will able to see answer statuses from both the client and agent. Note, that if the Answering Machine Detection (AMD) is enabled, you may encounter the "AMD-MACHINE" status, indicating that the call was identified as being answered by a machine, leading to the system terminating the call. The list also contains other valuable information such as custom statuses assigned by agents (if those were used), the amount of retries, among other details. For added convenience and to facilitate further analysis, you have the option to download this list as an updated CSV file by clicking on the "Download CSV" button, should you need to do so.
¶ Live Monitoring Dashboard
To enhance the convenience of monitoring your Autodialer campaign's effectiveness in real-time, we have developed a monitoring dashboard. This tool is designed to provide you with a comprehensive overview of relevant statistics, allowing for detailed insights into the campaign's performance in real time. Moreover, it offers visibility into agent workloads, enabling you to assess and optimize team productivity efficiently. By leveraging this dashboard, you can make data-driven decisions to improve the outcome of your campaigns and ensure optimal resource allocation, thus maximizing the return on your efforts. You can open the dashboard either for all campaigns, or one campaign specifically. Simply press the Live stats button to open the dashboard in a new tab. Let's explore the information seen in the Dashboard.
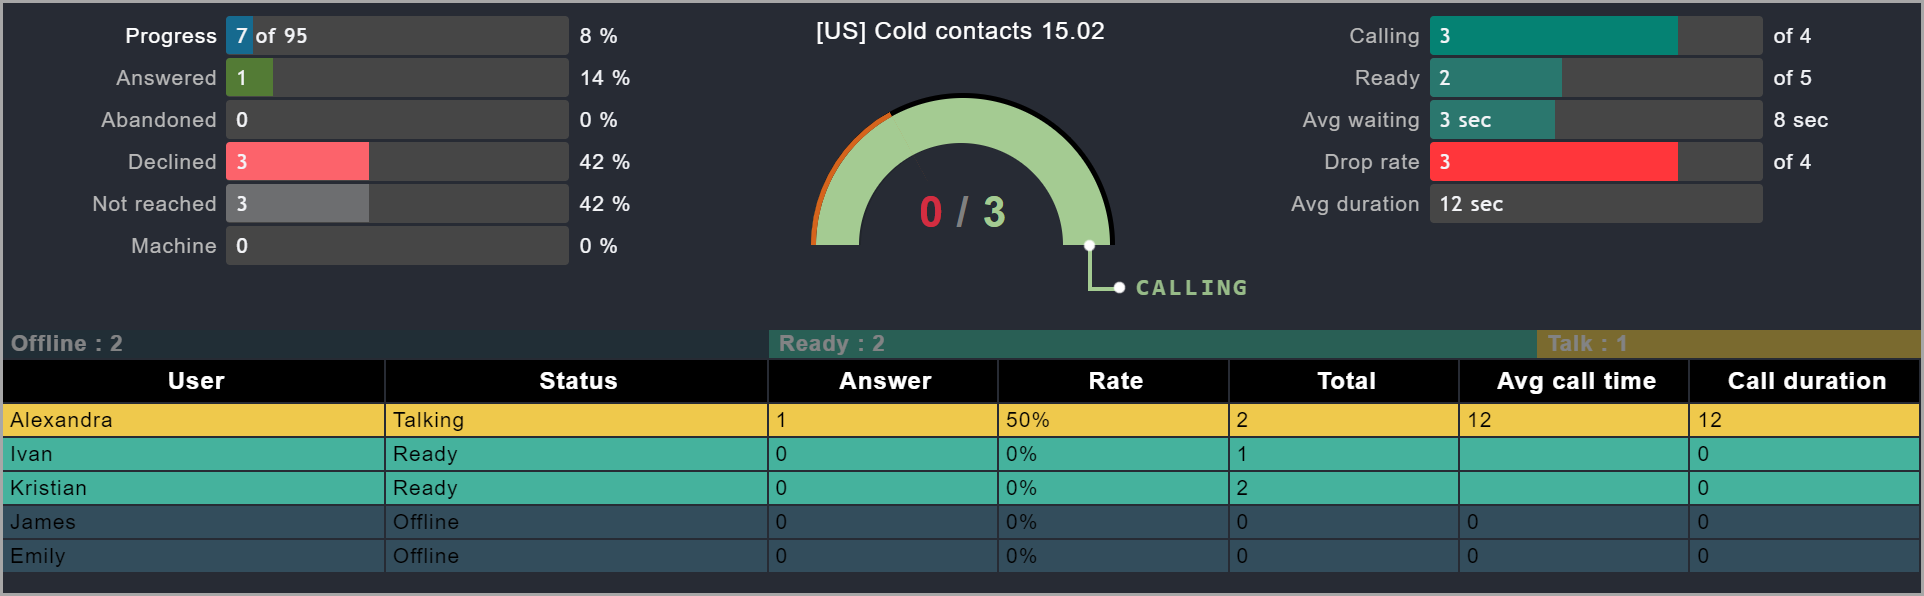
At the center of the dashboard, you'll find real-time data on concurrent calls. The "Waiting" indicator shows the number of calls in queue to connect with an agent, while "Calling" reflects the ongoing call attempts made by system to your contacts.
To the left, you can see the overall campaign progress and status updates are displayed. Answered indicates successful connections with an agent. Other statuses provide insights into calls not connected for various reasons:
Abandoned means the callee hung up before being connected to an agent.
Declined indicates the call was rejected by an agent.
Not reached shows amount of calls, where the system wasn't able to reach the contact.
Machine signals calls ended by Answering Machine Detection.
On the right, you'll find relevant, useful statistics.
Calling - amount of current concurrent calls.
Ready - the amount of agents that are available for calls.
Avg waiting (sec) - average time the agent waits before receiving a new call. Wait time calculation starts from the point when Autodialed initiates call attempt until the point call attempt was successful - lead answers or cancelled - no one picks up, or call fails.
Drop rate - the ratio of picked up and declined calls by agents.
Avg duration (sec) - the average length of calls. Duration is calculated from the moment when the contact picks up the phone.
The lower section of the interface showcases all agents assigned to the campaign, their current status, and individual performance metrics. Key statuses include:
Talking - where the agent is engaged in a conversation with a client.
Ringing - indicating the system is waiting for the agent to answer.
Ready - meaning the agent is available for a new call.
Offline - meaning the agent's SIP is not online.
Following status, you can monitor the following data for each agent:
Answer - the amount of answered calls by a particular agent
Rate - the ratio between answered and dropped calls
Avg call time - the average time spent on a call for a particualr user in seconds.
Call duration - total amount of talk time in seconds per user.
¶ Using Autodialer with Operator Dashboard
While it's not mandatory, utilizing our Autodialer in conjunction with the Operator Dashboard presents multiple advantages.
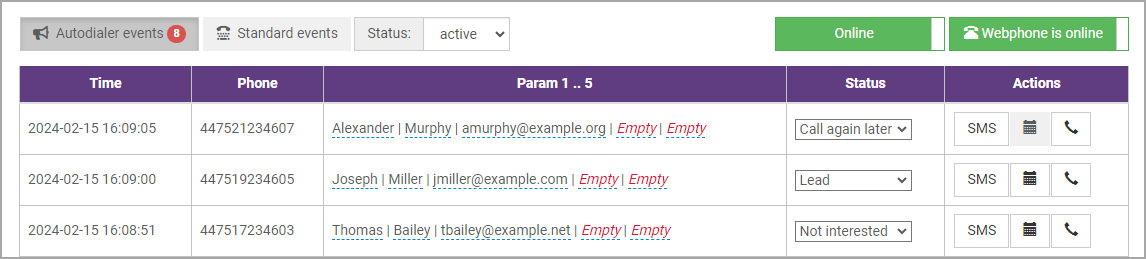
As highlighted in the Contacts section of our guide, our system allows adding multiple parameters into your contact information. This enriched data becomes accessible in real-time on the Operator Dashboard whenever an agent handles a call. This direct and immediate access to detailed contact information allows the agent to easily identify the contact, making each interaction more personal and informed. Additionally, during the call, agents have the flexibility to select from various pre-defined statuses configured in the Customized Statuses section in campaigns settings. These selected statuses are then stored in the contact list, allowing for subsequent lead processing.
Further enhancing the operational capabilities, the system offers a range of quick actions. Agents can effortlessly send an SMS to the contact during or after the call, schedule callbacks at any time, and initiate immediate calls to any of the recent contacts if needed.
The synergistic use of the Autodialer alongside the Operator Dashboard not only optimizes communication workflows but also enriches the quality of interactions with your contacts, thereby improving the overall effectiveness of your campaigns. By leveraging these advanced features, you can achieve a higher level of engagement and significantly improve your operational productivity.
API
Our API offers full range functionality for working with the Autodialer, allowing for a fully customizable integration to fit your specific operational needs.
Although this guide does not go into the specifics of operating the Autodialer via our API — assuming that users seeking such functionality already possess a certain level of technical expertise and understanding of our system — we want to emphasize that definition and explanation of available API methods are provided in our API documentation, which is accessible here.
¶ Common Q&A
Q: My campaign isn't running, even though I pressed start. Is there a problem with the service?
A: There are several potential reasons for this issue that you can investigate on your own before contacting our support team. The most common problem is incorrect operational hours. Ensure that the "End time" is set to a future date and that the operational days and hours have been correctly selected. If these settings are accurate and the campaign is still not functioning, verify that the correct users have been selected and that these agents are currently online. Lastly, check the status of the "Active operators" option. If it's enabled, agents must open the Operator Dashboard to start receiving calls.
Q: In the Live Monitoring Dashboard, the progress bar is already 100%, even though I just loaded the contacts. What's the issue?
A: After the campaign is completed, it shouldn't be used for the second time. Instead, create a new one with your new contacts.
Q: We have calls that are answered and agent name not showing despite having recordings. Why is that?
A: If we are talking about predictive dialer, it operates by first calling the client, then the agent, and subsequently connecting them. So it is indeed the case that if only the client is reached, the call will be considered answered and thus will register a duration. This occurs even if the agent is not reached at all because the call is technically active—the first leg of the call is active.
Q: We have a call that went to voicemail however it was still connected to an agent, even though we have AMD enabled.
A: AMD tool should never be considered to be at 100% proof, be advised of 70-80% accuracy.